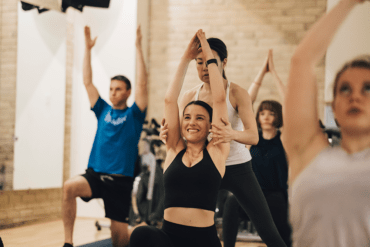
In January, Totum chiropractor Stacy Irvine made a guest appearance on CityLine to explain how to incorporate cardio, strength and mobility into your workout and why all three are important.

In January, Totum chiropractor Stacy Irvine made a guest appearance on CityLine to explain how to incorporate cardio, strength and mobility into your workout and why all three are important.

We all know that the leg bone connects to the hip bone, but did you know that your primary hip bone also connects to your diaphragm?
Diaphragm 101:
The diaphragm is our primary breathing muscle. It is a dome shaped muscle situated at the bottom of the rib cage that functions by depressing downward like a bellow to pull air into your lungs from the outside by creating negative pressure inside the chest cavity.
Oxygen intake is very important for athletic performance, particularly during long duration aerobic activities like distance running. With time, metabolic byproducts of muscular contraction build up in the tissues limiting performance. Breathing provides working tissues with oxygen and removes these waste products at the same time. Functionally, the diaphragm also plays an important role in stabilizing the core. It forms the top of the inner unit, the deepest layer of abdominal tissues that surround our organs and spine.
To see what natural diaphragmatic breathing looks like, take a look at a young child. Their belly pops in and out as they breathe, their chest staying relatively still unless there are exerting themselves. We often see the exact opposite in adults. Lots of expansion in the chest and inward movement of the belly. By not using the diaphragm, breaths become shallow and less effective, as only the upper portion of the lungs expand. Functionally, a loss of diaphragmatic contraction interferes with activation of the inner core musculature which places more demand on larger superficial muscles for spinal stabilization. This dysfunctional pattern of stability is much less efficient and can become the root cause of a host of different injuries.
So what does all this has to do with your hips?
Today’s medical model tends to localize problems in the body to the area of symptoms alone, when in reality, the body is interconnected from head to toe. This becomes extremely apparent when we take a look at the musculature of the front of the hip.
The psoas muscle is a powerful hip flexor that starts at the bottom third of the spine, traveling downward through the pelvis and attaching to the front of the upper leg. At its point of origin, the psoas has a strong connection to the diaphragm. The psoas plays a major role in gait and spinal stability. Due to its location and size, it has a tendency to become hyperactive, especially when the inner core musculature isn’t working correctly. These factors create an interdependent relationship between the two muscles. If one is tight, it affects the other.
Clinically, I often see significant changes by simply re-establishing an awareness of the diaphragm and loosening the hips. Here are a couple of exercises you can try.
Stretching your psoas can also be helpful to release pressure from the lumbar spine and diaphragm.
The joy of running is that it’s easy to throw some shoes on and go for a run! We all know how to run (even when some of us look goofy doing it), but should we all be running? As a physiotherapist, there are a few things that I always assess when I see a new patient with a running injury. One of those is range of motion (ROM) of certain joints. When we run, we are repetitively going through the same ROM’s. If we don’t have enough ROM in the right places, well… the range has to come from somewhere else. That somewhere else tends to be where an injury forms.
Here are three things you can check on yourself, to see if you are setting yourself up for an injury, or if you’re good to go!
 Toe Extension
Believe it or not, if you are missing toe extension, you are at risk of a myriad of injuries, especially to your achilles tendon. Such a little movement, but actually a big deal. To test, pull up your toe…you need 30° to run safely. Reasons for this movement to be lacking could be previous joint sprains or breaks, or arthritis.
 Ankle Dorsiflexion
Sit on a chair, and put your big toe against the wall.
Keeping your heel down, bring your knee to the wall.
If you can do this, you have enough ankle ROM to run.
(Please note, while this is enough range to run, to do a lot of other functional tasks during the day, you need way more than this. Normal ROM for this movement would be where you can move your foot 8-10 cm away from the wall, keep your heel down, and still get your knee to the wall.) This movement tends to get stiff if you have sprained your ankles a lot, or broken your ankle in the past.
 Hip Flexion (Hamstring stretch)
I’m not looking for circus moves with this one.
You need to be able to lift your leg 70° from the ground to have enough range for running.
When you do it, make sure your low back isn’t rounding out, and pushing into the ground…the movement should be coming from your hips, not your spine
How to fix it: what to do if you don’t have enough range
So what do you do if you’re missing range on any of these movements? Well, the tests are also the exercises to improve their ROM. You can try to work at them for a couple weeks…preferably 4-5 times a day with 30 second holds. Yup, it’s a lot. If you’re not noticing a change after 2 weeks, that’s when you need me.
Check these movements out…it only takes a minute, and will keep you running safely this season.

When it comes to motivation, most of our barometers are running pretty high at this time of year. Imagine what we could achieve if we could harness that same drive all year long?! Here are a four tips to keep you on track beyond the resolution season.
1. Find The Right Gear
With those shiny new resolutions posted on your mobile screen or bathroom mirror, you may be eager to launch full blast into a new workout schedule. Training five or more days a week is not necessary for most of us, and in some cases, counter-productive. Go out too hard and you may risk losing steam or overtraining which can lead to burn out and injury. Go out too slow and you may lose interest or get discouraged from a lack of results. Aim for 2-4 weekly workouts, based on your personal circumstances and goals. You can always gear up or down based on your results. You can also supplement your workouts with activities outside of the gym, if you’re eager to move more.
2. Take Aim
As our chiropractor, Dr. St-Pierre, would ask: “Are you working out or are you training?” Training implies actively working toward a performance goal – be that walking a flight of stairs without pain, completing a 5K or improving your SUP game. Determine a measurable goal that is fun, challenging or meaningful for you. Spring and summer charity events are great ones! If it’s more of a long term goal, break it up into shorter mini goals to keep you excited in the interim.
3. Team Up
Chances are that you work nearby, live nearby or both. Chances are as well, that you have friends, family or colleagues nearby who would make great workout partners. Consider doing classes together, claiming side-by-side treadmills, or doing semi-private training. If your best accountability buddy can’t make it to Totum, you can still share goals and check in with each other routinely.
4. Schedule Check-ins and Tune-ups
Getting bored with your routine? Already met your short term goal weeks ahead of schedule? Unsure about that pain in your knee? Scheduling monthly or quarterly check-ins with a trainer is a great way to stay on your game. You can use these sessions to measure progress, set new goals and modify programming, or to address areas of concern. Our training and client teams have a wealth of knowledge to help you stay healthy and motivated throughout the year.

Have you signed up for gym membership or consulted with a nutritionist to kick off your 2016 fitness goals? Awesome! You’ll soon be feeling strong, svelte and generally more fabulous. Yes, I have absolute faith you can do it. But be warned. Achieving success in the gym can wreak havoc on your closet!
As a fashionista, you may jump at the chance to coordinate new purchases in your new smaller size. To others, the task of restyling may be daunting, stressful or even upsetting. Before you throw in the towel or take your credit card out for a marathon shopping spree, consider these smart solutions to help manage your wardrobe as your size and shape shift:
 1. Start at The Bottom
A sharp look starts with good foundation garments. Your bra and underwear size may change as you lose inches. If the underwire rides up or if that pretty black lace is no longer snug to your skin, it’s time to refresh. Visit a local boutique for a professional bra fitting and consider investing in at least one high-quality bra that fits well now and will also fit if you lose another half inch off your bust line. With the girls well supported, you’ll appear taller and slimmer through the torso, while the right underwear will ensure a great rear view in your favourite outfits.
2. Tailor to Your Needs
Like your hairstylist and naturopath, a tailor could become your next best friend. A skilled tailor can alter different parts of your blazers, shirts, pants, skirts and dresses to ensure a better fit as your measurements change. This small investment in your best pieces can extend the life of your outfits by several months.
 3. What’s Old Is New Again
Second hand shopping is a smart way to get “new to me” items while saving on cash and your environmental footprint. Bonus points for this eco-friendly option. Patience, savvy and comfortable shoes will serve you well in treasure-filled consignment and thrift shops where you can spend shockingly low prices on pre-loved pieces. Online classified groups and clothing swaps are another fantastic way to find gently worn casual or work wear. This one’s win-win as you can also unload those larger sizes that no longer fit and often have leftovers donated to charity.
4. Rent vs Buy
Whether you’ve achieved your goal or are still working toward it, special occasions are the perfect opportunity to celebrate your success. Go ahead, get dolled up and strut your stuff with new confidence and a fancy frock. But instead of spending a small fortune on a dress that may not even fit by time the next wedding invitation arrives, consider a designer dress rental.
The expert stylists at Rent Frock Repeat will help select a style and size that shows off your assets and all your hard work! Did you know Rent frock Repeat carries sizes 0-24 and you can even rent a second size for only $10 to make sure the fit is perfect the day of your event? And did you know that Totum members receive 15% off dress rentals? Become a member on rentfrockrepeat.com (it’s fast and free), to view their entire dress inventory.
 5. Hold On
If you’ve followed the plan, you should arrive at a size, shape or fitness level that you feel great at and which you can sustain healthfully. At this stage, you’ll inevitably have a few great items in your closet that are just a bit too big and too nice to part with. Consider hanging onto these select few pieces for one more season. Life happens and in the case that you gain a few pounds or inches again, you don’t want to find yourself in the same situation with nothing to wear eight months from now. If by the next season they are still too big, part ways!
Tip: The same principles apply when your weight and body move in other directions.
Overview
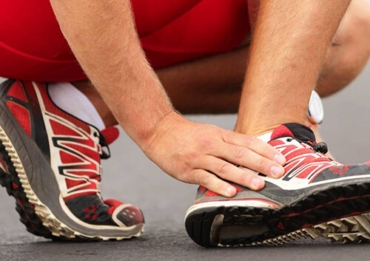
Lateral ankle sprains are one of the most common injuries occurring in sports.
Soccer players are at an increased risk due to the nature of the sport incorporating running, kicking, quick changes of direction, and playing surface.

Grading a Sprain
There are 3 Grades of ankle sprain, which depends on the amount of damage sustained in the ligament of your ankle.
Treatment Options
Conservative therapy/treatment and rehabilitation NEEDS to start right away, even with Grade 1 sprains. The goal is to prevent recurrence and to build the strength and balance around your ankle. Injured muscle, tendon and ligaments heal with stronger and more organized collagen fibril architecture when a gentle load is applied during the healing process. Chiropractors or physiotherapists are great health care providers that will guide you in the right direction in regards to your treatment plan.
Rehabilitation of your ankle should be done in a step wise manner. The program should start with non-weight bearing exercises, moving to resisted exercises, and then weight bearing activities. Of course no two injuries are the same and your health care provider will be gearing the rehab based on their assessment. The basic components of a rehab program are as follows; PRICE, range of motion (ROM), Strengthening, Proprioceptive exercises and functional exercises.
P.R.I.C.E.
Initial treatment methods — or P.R.I.C.E. — include:
Restoring Range of Motion
Functional ankle rehabilitation starts by normalizing joint ROM. This involves gentle movements of your ankle, taking care to avoid causing further tissue stretch injury. This aspect of healing can be performed by you with at home exercises and further enhanced in clinic by your chiropractor or physiotherapist. For example, performing gentle ankle pumps or drawing out the Alphabet with your foot to encourage movement. As symptoms allow, you can begin to progress to weight-bearing exercises.
 Ankle Pump: Point toe, then pull back toward you as hard as possible.
Strengthening
Resistance exercises can begin when there is no pain through the available range of motion, with full weight bearing. Rehabilitation programmes usually start with low-level strengthening such as holding a sustained contraction. From there you can progress to exercises using a Theraband. See below for some examples of exercises. Once you are have reached pain free motion doing these exercises you can progress to body weight exercises.
Theraband:
 Inversion – Sit with your legs out straight and cross your uninjured leg over your injured ankle. Wrap the tubing around the ball of your injured foot and then loop it around your uninjured foot so that the Thera-Band is anchored at one end. Hold the other end of the Thera-Band in your hand. Turn you injured foot inward and upward. This will stretch the tubing. Return to the starting position. Repeat 10 times. Do 3 set of 10.
 Eversion – Sitting with both legs outstretched and the tubing looped around both feet, slowly turn your injured foot upward and outward. Hold this position for 5 seconds. Repeat 10 times. Do 3 sets of 10.
Proprioceptive / Balance Exercises
Retraining your proprioceptive/balance system is an integral part of sprain rehabilitation and is often forgotten. Sustaining an ankle sprain leads to significant deficits in balance. Ankle disc training (wobble board) has been found to significantly improve balance testing and decrease symptoms of functional instability. Proprioceptive training has also been shown to reduce the rate of re-injury in ankle sprains. Some examples of exercises are listed below
 Toe Raises: Stand in a normal weight-bearing position. Rock back on your heels so that your toes come off the ground. Hold this position for 5 seconds. Repeat 10 times. Do 3 sets of 10.
 Single leg balance: Stand without any support and attempt to balance on your injured leg. Begin with your eyes open and then try to perform the exercise with your eyes closed. Then try it with your knee bent. Hold the single-leg position for 30 seconds. Repeat 3 times.
Functional/Sport Specific Exercises
The final phase of acute ankle sprain rehabilitation consists of functional exercises and sport-specific drills. These may begin when there is full ankle range of motion, no pain, and about 80% strength compared to the other ankle. These exercises help the athlete re-learn sport specific motor patterns. The patient should start at a low level of intensity and progress with increased intensity and difficulty provided they remain pain free while performing the exercise, and have no pain or swelling following the training session. In terms of soccer you can do drills that involve weaving in and out around pylons, skipping, kicking drills, and running with changing directions.
Conclusion
Treatment and rehabilitation of ankle sprains is important to speed up recovery and help avoid recurrence. Your chiropractor or physiotherapist have many options to assist with your healing and get you back to your sport healthy and strong.
References

Going for a run can be an intimidating prospect in the best of weather. Living in Canada, we are obviously faced with at least a few months of “less than ideal” outdoor running conditions. In this article I am going to discuss running safely and effectively in the winter months.
First we are going to put to rest a winter running myth. You are not going to freeze your lungs if you run in the winter! By the time the cold air hits your lungs it has warmed up. I have run in some very cold weather and lived to tell about it. So no excuses!
The key to having a successful run in the winter is having the proper gear. In the winter, it’s all about layering. We will walk through how to layer up and still be able to move for your run.
The trick to determining how much to wear when heading out for a brisk winter run is to add 10 degrees to the outdoor temperature and dress for that temperature. This represents your body temperature, and so it is how you should dress. Also, taking note of how cold it was outside, what you wore and how you felt on the run is a good habit to form so you have a better idea of what to wear. You should feel a little cold at the beginning of the run then as you start working harder, your body will heat up to a point where you should be comfortable.
For your upper body the first layer should be tight-fitting and moisture-wicking. Not cotton…cotton is rotten and will stay wet when you sweat. The second layer is one you can play around with to best suit the temperature: a T-shirt, a looser fitting dry fit or even a sweatshirt if it is very cold. The last layer I recommend is a jacket that is going to cut the wind. If you have something that gets rid of the wind chill, it will make a big difference.
On your lower body, you definitely want to be in pants — Spandex, yoga style or even a nylon pant will do, just make sure you can move in them. You can put a second layer on your lower body when it’s really cold. I usually always wear at least tight shorts under my pants.
Be sure to cover your hands and ears as well. Your extremities will get especially cold in a colder temperature. Proper gloves and a toque or headband are an absolute must. It may also be warranted to get some warmer winter running socks to keep your toes warm.
Now that you are dressed and ready to take on the great outdoors, another thing you need to consider is the slippery conditions of the sidewalk. Ice can be hard to spot, so make sure to watch out for it. Try to avoid routes that not well kept and potentially very icy. And if this is not avoidable, run with a wider stance and slower pace as this is more stable.
Since it’s cold outside, it’s important to ease into your run — or better yet, do a warm up pre-run. You do not want to step outside and start out at a fast pace, as your muscles will be cold. So start off easy and let your muscles warm up. Then you can increase your pace.
Another thing to consider with winter running is the lack of daylight. Be sure to have something that lights up or is reflective on while running in these conditions. Also be sure to check before crossing roads because you are harder to see in the dark.
A few local areas that I have found that are well maintained throughout the winter are the Lakeshore trail and Mount Pleasant Cemetery.
If you absolutely must do a run on the treadmill due to a blizzard…this is the only acceptable circumstance. Put the incline to 1.0 — this makes the effort level more comparable to outdoor running.
Lastly, set a spring time goal! It’s really hard to stay motivated in the winter, so I advise everyone to sign up for a race in the spring time. That way you have to keep training and running through the winter months. There are a lot of great races in the Toronto area in the spring, so check them out. All this winter running makes you way tougher for these spring races.
See you out on the roads….Stay warm and happy running!

Face it: training is hard on the body with all that pounding our muscles, joints and ligaments face a lot of stress. Too much stress leads to inflammation in the body, which over time can lead to injury. Add anti-inflammatory foods to your diet daily, such as ginger, turmeric, pineapple, fish oil and garlic, to help keep your inflammation in check and your immune system strong.
 It’s important to eat a good breakfast daily. Aim to consume 20-25% of your daily calories at breakfast to keep you fuelled longer and help ward off evening eating excess. On days when you are not training first thing, try swapping out the oatmeal for some eggs and handful of nuts. Or have a protein rich smoothie with veggies, 1/2 an avocado and only 1 cup of fruit. Proteins and fats will give your body long lasting energy and make you feel more satisfied and reduce cravings later on in the day. If you are training first thing in the morning, easy to digest carbs are the way to go, as they digest quickly so you can get on with your workout.
Well, training is not an excuse to eat whatever you want! The more stress you put on your body through training demands, the better your diet should be, not the other way around. Not only do you need to worry about the number of calories, carbs, proteins and fat — you also need to consider all the micro-nutrients such as vitamins, minerals, enzymes and bioflavanoids that your body needs increased amounts from to support your training. Focus on the more nutrient-dense, not calorie-dense foods, to offer you the most bang for your buck. Load up on veggies throughout the day, and say no to refined carbohydrates and processed foods.
Wandering through the grocery aisles without a list will leave you open to poor food choices. Take 10 minutes before going to the store an plan out a few days worth of meals and then identify what ingredients you need and stick to the list.
Fish with the highest amount of EPA/DHA omega-3s are salmon, mackerel and sardine. Other good sources include herring, anchovy, lake trout, rainbow trout and tuna. Seven to ten ounces of fish per week is a good start to reaching your omega-3 intake. Another type of Omega-3 is alpha-linolenic acid which is found in certain plants. There are fewer contaminants in vegetable oils. Flax is the highest source of alpha-linolenic acid, then chia seed, hemp seed, pumpkin seed and walnut.
If you are trying to stay healthy then plan ahead for daily snacks. Mixing veggies and protein or veggies and a healthy fat will provide an energy boost between meals, without a spike in blood sugar. Avoid breads and baked goods and try 1-2 cups of veggies and a 1/3 cup hummus or two hard-boiled eggs or 1oz of nuts. If you have a workout planned within 2-3 hours then add a piece of fruit.
Clean Up! Avoid refined, processed foods with additives, preservatives and chemicals such as artificial sweeteners, colourings, flavourings, as they will only deplete your body of nutrients. Read the ingredient list – if you don’t know what it is, don’t buy it!
Try cooking foods more often so that you can control what goes in the meal. Home made foods are generally better for you. During the week plan for quick meals such as quinoa, chicken breast and a pile of bright vegetables that can be made in 15 minutes. Make a little bit extra for lunch the next day. When you have more time try making a larger portions of soup, chili or a roast that can be used over a couple days.
Make sure you start all workouts in a hydrated state. When dehydrated you can’t perform at their best and you increase risk for injury, such as muscle tears or strains. Consume 2-4 cups of water in the 2-4 hour window leading up to your workout. For workouts lasting longer than 60 minutes make sure you carry water and consume 1/2 to 1 cup of water every 15 – 20 minutes to prevent dehydration.

Do you get the 7-10 servings of vegetables that an active individual needs per day? Vegetables are dense in nutrition but low in calories. They offer lots of fibre, vitamins, minerals and bioflavanoids. It’s important to eat a variety of them from all colour groups to increase your nutrient spectrum.

I am a cardio junkie. I will gladly run for hours at a time, and I truly believe that there is no better way to start a day than a sunrise run along my favourite path. I also have a tendency to avoid strength training at all costs.
I am also a physiotherapist who is passionate about helping runners get back to crushing their running goals, being stronger than ever and staying injury free.
Unfortunately, I am well aware of the fact that those two identities are somewhat ironic.
For a long time, I was delighting in tracking my ever-increasing mileage each week, ignoring the advice that I gave to clients on a daily basis about the importance of strength training, and signing up for every race that I could manage to squeeze into my schedule.
So began my seamless transition into injury.
As a physio, I knew that I was on the fast track to disaster, yet I felt invincible. Perhaps it’s more a question of being lazy. Either way, I was not impressed as it became increasingly apparent that my bad habits were catching up to me.
Hobbling into the off-season with aches and pains, I vowed to finally address the underlying factors that had been contributing to the injuries that I was fighting through. Focusing on strength and mobility throughout the quieter months meant that I could attack the following season healthier, faster, stronger and more in love with running than ever before.
Whether your goal is to get through next season without injury, to finally snag that PB or to up your game with some longer distance races, planning your off-season appropriately is an essential first step in setting yourself up for success.
Here are a few pointers that I frequently share with my clients (and even adhere to myself!):